I’ve had an older HP 10544A ovenized crystal oscillator laying around for some time now, waiting for a good project to be put to use. It’s a high precision frequency source that fell out of spec and was pulled from other test equipment.
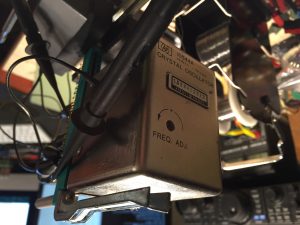
The first question if I was going to re-use this part, is why it fell out of spec to begin with. These crystals are inside an insulated case with a heater that keeps the crystal at a constant, hot temperature. The problem could lie with the crystal itself, the circuitry supporting the crystal, or with the oven maintaining a stable temperature for the crystal. In this case, hooking it up, and doing some quick measurements showed that the oven wasn’t turning on properly, and if the crystal never gets warm, it will never be at the specified frequency.
After opening it up and doing some digging around, it became clear that the thermistor, which measures the temperature to control the heater, had gone bad, and always read that the oven was very hot, so the heater would never turn on.

After replacing the thermistor, the heater started working again as expected, so I was ready to use the crystal as the oscillator for a homebrew GPSDO.
A GPSDO or GPS Disciplined Oscillator, is a combination of a local oscillator like this crystal, and a high quality GPS receiver, which allows you to combine the best timekeeping aspects of both. The crystal will be very stable over the short term, but over longer time periods may drift, whereas the GPS may hunt around a bit in the short term, but over the long term, GPS is incredibly accurate, as it’s sourced by atomic clocks on the ground and on the satellites. Combining the two lets you take the short term stability of the crystal, and use the long term stability of the GPS to “push” the crystal to stay on target and avoid the drift.
I set to work gathering together the components I’d need to build the overall device, a power supply, the GPS, the Crystal, and a processor to measure the crystal and GPS, then adjust accordingly.
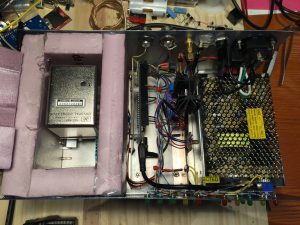
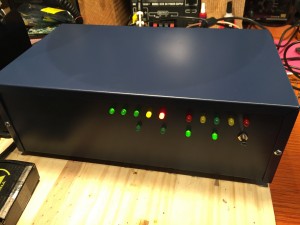
I used an Arduino Due to handle all the measurement and processing, as it has some very fast, and capable timing functions, and packaged everything up into an aluminum box I grabbed from the local electronics hobby store and painted.
I’m still working on the code, and doing some final tweaks to the hardware to get everything just the way I want it to be, but now it’s just a matter of *time* till it’s done.