As a previous post mentioned, I got a new 2012 Subaru Outback recently, and since then, I have decided to put a trailer hitch on it, so I can pull a small trailer with my motorcycle on it.
I did a lot of browsing around on subaruoutback.org, looking at photos of other people’s hitch installs, specifically looking for things like how far below the bumper does it hang, and how far out from the rear of the bumper does it come. For me, neither was particularly desirable. I like the aesthetics of my car, and didn’t want some big hitch sticking out the back.
I ended up finding a hitch, which from what I can tell sits the closest to the bumper, and doesn’t stick out at all. It’s the Torklift EcoHitch Stealth for the Subaru Outback of 2010 or newer, and a 2″ receiver.
It’s not the cheapest model around, but it fits my requirements best, and in my experience Torklift makes good products.
Anyway, in summary, I ordered one, and it arrived today. The weather forecast said the weekend wasn’t going to be fun, so I decided I’d put it on now. I took a whole bunch of photos, so I’ll go through the install steps, noting where I differed from the provided instructions, and provide some pictures for visual aides.
1. Unpack Hitch
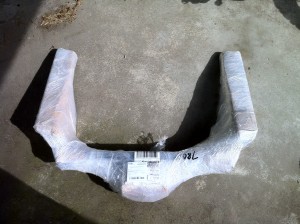
The hitch doesn’t come in a box, it comes wrapped in some cardboard and a crapton of plastic wrap. It’ll take a few minutes to get off.
2. Lower The Exhaust
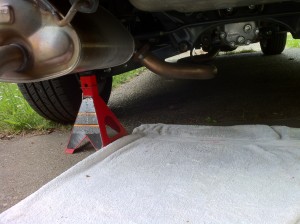
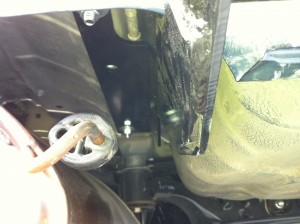
This portion is pretty much as explained in the Torklift instructions. In summary, there’s three rubber hangers along the exhaust pipe near the rear of the vehicle. Two right by the muffler can, and one up a little farther near the axle. My car is pretty new, so these haven’t gotten too grimy, so they were easy to get off. If your car is older, it’s been recommended to use something like WD-40 to loosen them up.
Also, don’t drop it all the way to the ground. The tailpipe shouldn’t flex that far. I used a jackstand to hold the tailpipe up since I didn’t need the jackstands for the car as it has lots of ground clearance.
3. Remove the Bumper Fascia
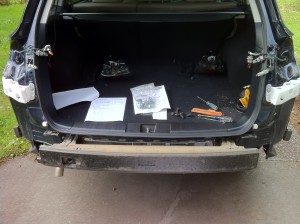
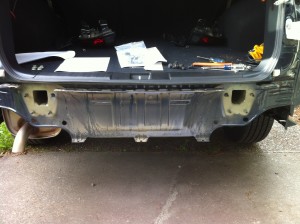
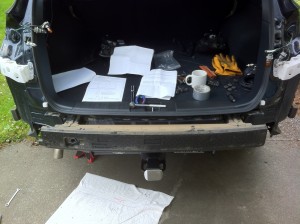
This step isn’t actually in the Torklift instructions, but IS in the instructions for the Subaru hitch. Removing the bumper fascia and the bumper rail gets you access to the ends of the frame rails, which 1. makes it much easier to get the bolts in to actually mount the hitch, 2. solves a problem we’ll run into later, 3. Makes it so we don’t have to tear apart all the floor of the trunk. In this case we’re trading pulling off the bumper for pulling out the trunk stuff, and gaining easier access and a problem fix. I HIGHLY RECOMMEND THIS METHOD.
Here’s the link to the Subaru instructions which tell you how to remove the fascia. Subaru
4. Remove the Bumper Rail
Same deal as step 3. Just getting access to the end rails. This involves pulling off eight 14mm nuts. Then the rail comes off.
5. Place the Mounting Bolts
The included hardware packet comes with a bolt fishing wire, and after pulling out a few rubber plugs from the bottom of the frame rails, simply fish the plates, lock washers, and bolts through the holes. One of the holes on the Driver’s side is blocked by a piece of heat shielding. I undid the four small bolts holding on the heat shield, cut out about a 2″x2″ square where the hole is with tin snips, and reattached the heat shield before putting that mounting bolt in.
6. Hang the Hitch
This part would be easier with a friend, but was entirely doable by myself. The hitch is just rather heavy and unwieldy. Anyway, hold it up, and being careful not to push the bolts back up into the rails, just thread the nuts on to hang the hitch. Don’t worry about tightening them yet.
Also, the Torklift instructions say to bend the middle bumper tab all the way back, and the two side tabs down. These instructions assume you’ve left the bumper on. You still need to bend the center one all the way back, but leave the two side ones where they are.
7. Construct A Tool
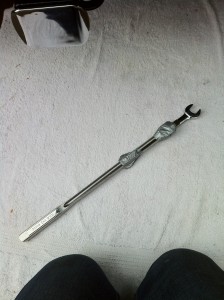
If you decided to skip a step and try to tighten the nuts onto the bolts some, you may have noticed that the bolts in the rails just spin. I’ve seen in the hardware kits for other hitches that they’ll use square head bolts and the plate will have a small indent to catch the top of the bolt to keep it from spinning. For some reason, Torklift didn’t do that or something similar. In fact, their recommended install method has you fish the bolts through a hole in the floor of the trunk, which means you can’t get a wrench or ratchet to the tops. Perhaps they use an air wrench, and it manages to overcome the top spinning. I don’t have an air wrench, so this poses a problem. I constructed a tool to fit in the open ends of the frame rails, to hold the top of the bolts. It’s my (patent pending) Hitch Helper!
It’s just a 3/4″ open end wrench, duct taped to a long breaker bar. The wrench is the right one for the top of the bolts, and the bar just gives me enough length to get it all the way into the frame rails.
8. Tighten the Bolts
Now we’ve got all we need to be able to tighten up the bolts. Do so.
Also, when the bolts are tight, it may pull the hitch high enough to make slight dents where the hitch comes under the rear panelly thingy.
9. Rehang the Exhaust
Now that we’ve got the hitch tight, we can hang up the exhaust again. This is simply reattaching those rubber hangers we took off near the start. I found it all relatively simple except for one hanger. The hitch now sits around one of the hanger pins and makes it kind of hard to fit your hands in there to push the hanger back on. This was probably the biggest fight of the whole install for me. I got the hanger sorta on, then used the wrench end of my (patent pending) Hitch Helper to push it on the rest of the way. The prongs of the wrench are spaced enough to let the pin sit in the middle, and does a good job of pushing the rubber hanger back onto the pin.
10. Reattach the Bumper Rail
This is just the opposite of how we took it off. Slap those eight nuts back on the bolts attached to the car.
11. Cut a Notch in the Bumper Fascia
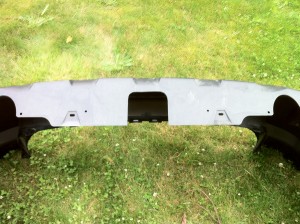
Part of the deal with this hitch being so close to the bumper, means that you need to cut a notch in the bottom of the fascia. Don’t worry! It’s on the bottom side, so is totally not visible to any passerby. Or really anyone unless they get under your car. Still might as well do a nice job though. I did the cut with some tin snips, and trimmed it up with a sharp knife. It’s just plastic so it’s an easy cut.
Also, the Torklift instructions say you need a 6″ x 6″ cut. That really is the perfect size. They tuned it from the last iteration where it said an 8″ wide cut. This is a much closer fit.
12. Reinstall the Bumper Fascia
Like the bumper rail, this is pretty much just the opposite of taking it off. Line up the tabs, gently push it all back together till it snaps in, the put back in the pop pins. With the exception of the center bottom one as we cut out that part of the bumper and the mounting tab has been bent back.
13. Admire Your Handiwork
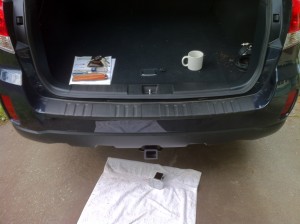
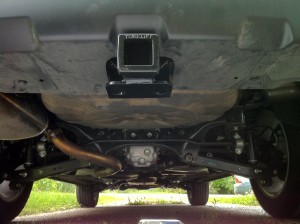
This is a damn good looking hitch as far as hitches go. NOTHING but the receiver tube is visible. The bar and everything else is hidden behind the bumper fascia. Take a gander!
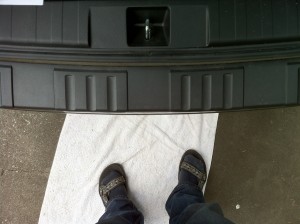
Also, like I said, it doesn’t stick out the back at all. Here’s a photo looking straight down the bumper fascia. Do you see the hitch? I don’t. That also means no shin bonking! YAY!
Summary
To bring everything to a close, use the Subaru instructions to get the bumper fascia and rail off, for everything else, pretty much follow the Torklift instructions with the modifications that having the bumper off allows us. Easier bolt placement, Not bending mounting tabs unnecessarily, and access to the top of the bolts for tightening.
Congrats! You can tow stuff!
Additional Photos
I’ve had a few requests for photos from different angles to get a better idea of how some things fit.
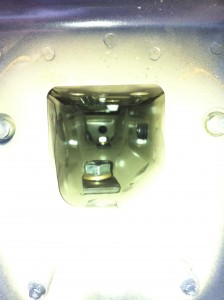
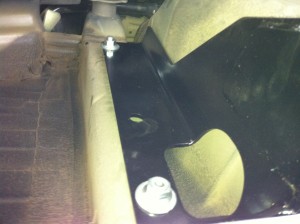
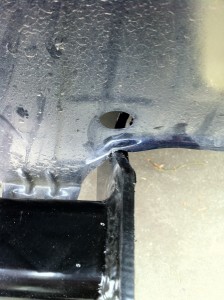
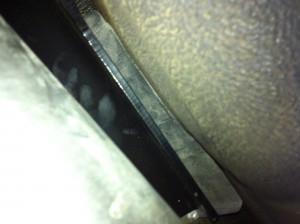
Heat Shield. Ok, this photo’s kinda hard to see, but it’s about the best I can get. The hitch gets installed OVER the heat shield, and ends up bending the flap over and against the spare tire well. On the very left is the muffler can, the black thing in the middle is the hitch, the silver bit is the heat shield, and the brownish-blackish thing is the spare tire well.
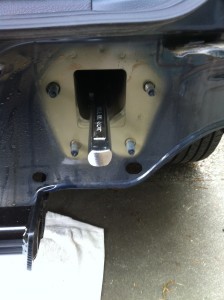
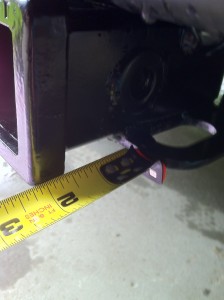
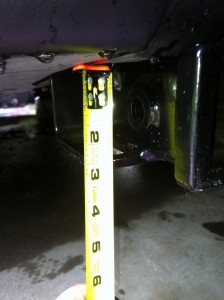
Spacing Around the Pin. There was some concern over using larger pins and having room for the safety chains. So here’s a couple photos. It looks to me that using a normal pin would be fine, a larger one I’m not sure. One fix would be to use some of those chain links with the screw gate on one side. That would extend the safety chain loop down and out of the way of a larger pin.
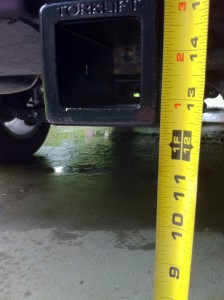
Total Ground Clearance. This one’s pretty self explanatory. With no load (nothing significant in the car, and no trailer attached, how high off the ground is the receiver. Looks like almost exactly 12.5″.

Pingback: Group buy: Torklift Stealth Hitch - Page 9 - Subaru Outback - Subaru Outback Forums
I would greatly appreciate it if it were possible to send me a copy of the Torklift instructions as I am considering purchasing a hitch. Perhaps you have a PDF or could just scan the instructions. I am contemplating doing the install w/o the bumper removal and that is the reason I want to look over the instructions. I am assuming the problem would be in being able to hold the head of the bolts so that they do not spin when you go to tighten from below.
Thanks in advance for any information.
Russell
Russell,
I’d love to send you a copy of the install instructions, however, Torklift has responded to others asking for their instructions with, “We normally dont post instructions or give them out ahead of time.” So I’m going to respect their wishes. However, that note was sent BEFORE the hitch was for sale, so perhaps now that it’s available, if you contact them, they may send you a copy.
However, I will try and answer your question the best I can here. The issue is that the included hardware for the hitch, specifically some plates for the bolts to rest and put load on which go inside the frame rails, aren’t keyed. So the bolt heads are free to spin. This gets to be a problem when trying to torque the bolts.
To be frank, there are only two solutions I see to this. Either A. You take a file or grinder, and cut a small indent into the plates to lock the bolt heads into place, or B. You take the bumper off and stick a long wrench down the frame rails to hold the bolt heads in place. You can do either.
However, even if you were to take route A. I would STILL recommend taking the bumper off for install. This is for a few reasons. 1. Cutting the slot for the hitch will be easier if you’re not upside down under a car, with poor light, trying to be precise about how you cut. 2. Lifting and attaching the hitch is significantly easier without the bumper in the way. 3. To get the bolts/plates into the frame holes to begin with, you either have to drill a hole large enough in the frame from below to fit them in through, have to enlarge a hole in the trunk area to make it large enough to fit the hardware through (torklift’s suggestion), or remove the bumper and have direct access to the frame rails with no drilling.
In summary, removing the bumper really isn’t very hard. In all honesty it was probably the fastest part of the job. It offers you flexibility in how you go about dealing with the bolts spinning, and it gives you access to the frame rails to put the hardware in without enlarging/drilling a hole.
It’s your car, and you can choose what you think is right for you, but if I were to help a friend, or to install another one, I would MOST DEFINITELY be taking the bumper off.
Hope that answers some of your questions!
Nigel
Thanks for these extensive instructions/tips. I put mine on yesterday, this info was extremely helpful.
For others, believe it: there’s no way I could have gotten these bolts tight without the bumper off and an extended open-end wrench (i.e. dowel and duct tape). Possibly this isn’t an issue if you have an impact tool. If I ever have this in on a lift for other work in a garage, I might just ask them to take a couple minutes to go at them with their tools. I can see why torklift recommends their method though, overall it’s much less involved.
I did the ‘crush the heat shield’ method, instead of cutting it to get access to the forward bolt hole as others have done. You do need to drill through the heat shield, but if you take out the heat shield fasteners it’s easy to see where the hole needs to be for this. I used a dremel (definitely a safety glasses experience). I just wonder if this bolt will seat over time as the heat shield ‘gives’ a little more, and unfortunately it’s the least accessible one [mine is a 2.5].
Getting the bumper rail back on tight is a challenge, the hitch hardware is up there now, and one nut on each side has both limited clearance and awkward position. My advice would be, have an extender (i.e. a pipe) to use with a box wrench or ratchet.
Without doubt, the most alarming thing is cutting up the bumper fascia. 6″x6″ is the right size, you won’t get any tighter than that. It cuts fairly easily with a heavy-duty knife. The inside bumper lip is a nice flat edge, so a t-square can help getting this even.
The second most alarming thing is pulling the bumper fascia off. It’s really not bad, the worst of it is the amount of torque you need to put on it to ‘unzip’ around the edge of the tail light cavity edge (and again getting it back on).
If you don’t know these ‘push pins’ that hold the plastic panels on, think expansion bolts. There’s an outer piece with 4 prongs, and an inner pin that, when pushed in, expands out the prongs from the outer bit. To take them out, they’re designed so that just pulling on the inner pin both releases and catches the whole assembly. Do Not just pry the whole thing out, I imagine that treating these incorrectly is the most common error people will make. Start on the easy ones under the rear bumper edge instead of the very awkward ones in the wheel well. You do get one mulligan from the one on the part of the bumper facia that will be cut away.
Also, note that if you have the wheel-well surrounds and mud flap options installed, these are held in with a lesser version of these push-pins; notice the difference.
I’d plan for 4 hours if you’re going to be examining the instructions, choosing tools, considering things, and learning on on the job. Yes, it’s maybe a 2 hour job the second time.
I am very glad that I spent the little bit extra to get this low-profile hitch.
Thank you for this write up. It was extremely helpful during my installation. Just to get some pictures to verify I was installing the hitch correctly was priceless. I installed my hitch on my 2013 outback in this manner and couldn’t be more pleased. What a good looking hitch.
Pingback: Got my '13 Outback! Indiana - Page 2 - Subaru Outback - Subaru Outback Forums
Thanks for the great write up – it was very helpful !
I have two mufflers (3.6R) and had a similar trouble rehanging them – so I just disconnected them, which made re-hanging them a snap. I wish I knew that beforehand, it would have made the tightening and torquing process a lot easier with the mufflers out of the way. (I hope I can reuse the gaskets….because I did.)
I took the FULL 4 hours to do this job – I didn’t have deep-sockets so a 30 min trip to the store was a good break.
Yeah, mine is the 2.5i, so I’ve only got the one muffler, so that’s what you’ll see in my post. Being able to re-use the muffler gaskets depends on how long you’ve had the car, if it’s brand new, then re-using them is fine, if you’ve had it for a while (more than a few months probably) then they’ll probably not be good for re-use. Generally people recommend if you disassemble it you should replace the gaskets, but I figure if they’re new anyway then it’s probably fine.
Glad that you found my write-up helpful. I did find the Torklift directions rather lacking, so I had hoped that I’d be able to help some of the other subaruoutback.org members.
I just did a 2013 outback, with the following hopefully useful notes:
1. Of all the steps, the rubber exhaust hangars were the most troublesome for me. WD40 helped a lot, but the key bit I missed was that it was okay to pull them off the CAR end, vs the muffler side. Car side has a small “barb” on it, muffler side is just a rod. You want (in some cases need!) to remove them from the CAR side.
2. The removal of the bumper fascia will NOT WORK easily if you have already installed the Subaru wheel-well moldings/trim kit. I got halfway thru that process before backtracking and doing it per Torklift instructions — fishing the bolts.
3. I found fishing the bolts through to be surprisingly easy. The hard part is opening up the topside holes (one on passenger one on driver side) large enough. I did that with a dremel, but it took some time. I was staggered at how — once I’d fished the wire — that the plate/lockwasher/bolt pulled into place.
4. The kit I got had star-lock-washers and I didn’t have any trouble tightening down on them without a wrench to hold the bolt in place.
Hope this stuff helps someone else. Appreciated the help you gave me!
1. I’d guess that since you did a ’13 your outback is pretty new. I did my ’12 within a few months of new and didn’t have much trouble with the hangers. Except for getting the farthest back one back on. Mostly because the muffler is in the way of being able to use your hands well.
2. Yes, my outback does NOT have the wheel well moldings/trim kit, so the bumper came right off. If I recall, others have noted that it’s a few screws to undo the trim kit, then you can remove the bumper as usual. I also believe the mud flaps will prevent bumper removal, but again, a couple of screws to remove them.
3. Yes, the fishing of the bolts was quite easy (granted I did it from the rear openings). You noted you used a dremel, which was probably a good bit slower than some other options. If I were to go that route, I’d probably look at a stepping drill bit (Those cone shaped ones).
4. I’m glad they’ve updated the kit to fix the bolt spinning issue. They just had standard lock washers in my kit, so there was NO WAY it would tighten down without taking the bumper off and using my improvised tool.
Thanks for stopping by and enjoy your shiny new outback!
Pingback: Short summary of hitch options? - Page 2 - Subaru Outback - Subaru Outback Forums
Pingback: Torklift install & installation instructions - Subaru Outback - Subaru Outback Forums
Hey , that the best instruction EVER to install your hitch, I’m happy that I find your website , the only damage I was made it was on heat shield drilling small hole and cutting plastic fender underbody and is nothing compare to torklift instruction.MY advice for everyone to remove exhaust completely instead of lovering it .Easy job even for one person.
Glad you found my post useful. The only downside to removing the exhaust rather than just lowering it, is that you’re *supposed* to replace the exhaust gaskets any time you disconnect the pipes. If your Outback is very new you can probably get away with it. Anyway, thats most of the reason why people avoid disconnecting the pipes like you suggest. Anyway, glad you got it on and enjoy your new hitch!
Pingback: 2" Troklift hitch height on 4th gen - Subaru Outback - Subaru Outback Forums
Hi, thanks for the post! I have installed a hidden hitch onto 2013 outback. Definitely use wd40 as removing those exhaust rubbers is no joke. Also if you can’t do 10 pull-ups and 20 push-ups, don’t try this installation alone. I had to use all my energy to mount the hitch because it came bent and I had to bend it with some leverage as I was tightening the bolts underneath. Otherwise the heat shield bolts were 1/8 th of an inch off.
I installed this hitch on my 2014 OB 2.5L. It was 2 weeks old which made the job fairly clean and easy. I removed the muffler and reused the gasket. Everything went as described here. Two guys with some mechanical experience completed in less than 2 hours. It would take longer if you don’t have the few tools needed handy. Deep metric sockets are desirable. The wrench on a stick idea worked well. I used tie wraps to hold the wrench on the rod. Basically it was a broom stick. I had star washers but one did spin inside the frame.
The most difficult/scary part was removing the bumper cover. There were a total of 9 push pins holding it on. You will go back with only 8. It takes a bit of force to pull it off. The noises it makes do not help confidence.
Be sure and check the centering of the hitch receiver before tightening. Also be sure to put the heat shield on before starting to lift the hitch. The hitch was heavy enough to need help without using a jack.
Great post! I really appreciate all the comments others posted as well. Total cost as of 7/2013 $295. dealer wanted $690. I got a better more hidden hitch to boot! Worth the work!
From Nashville, Cheers!
Hi Nigel,
Great post. Inspiring me to do the same on my 2012 Outback!
I have a question with hopefully a simple answer. Just a bit hard to tell from photos.
I intend to only use this hitch (for the near future anyway), with a 4-bike rack for the family (something like the Yakima Swingdaddy or similar). It is likely that I will need to be installing and removing the rack regularly since the car needs to be used for numerous things by both my wife and I. My question is simply – how accessible is the bolt hole in the hitch receiver for accessing a wrench/socket wrench on both sides to install/remove the bike rack bolt?
Oops, another question: Two years later, seeing any signs of degradation/rusting of the hitch yet?
Thanks!
Mike
BTW: I’ll be doing this in the next couple of months. This is a great resource and is much appreciated. In the spirit of helping others, are there any photos I could take along the way to help improve your info? I.e. Is there anything you get asked regularly that I could try to document to help answer regular questions? Let me know and I’ll try to do so and could send them to you.
Hello Mike,
Thanks for stopping by, and I’m glad you find it useful.
Regarding your question about how accessible the pin hole would be to a wrench/socket, I believe that shouldn’t be an issue at all. Between the chain loops and the bumper there’s not a whole lot of turning room, so if you just use a box end wrench, it probably won’t be very fast going, but if you just use a wrench to hold one side, and use a deep socket on the other, that should be pretty quick to take care of. No problem.
As for the condition, it’s till looking great. There is some surface rust on the inside of the receiver tube, as is the case with every hitch ever made, just because any paint/coating in there is beaten off by the hitch when in use. The rest of the paint on the hitch looks great, and I haven’t seen rusting anywhere else.
As for any additional photos, I can’t say that I’ve gotten too many requests for photos that aren’t in the collection already, but I think probably where it lacks the most is during the actual install itself, as I did the install by myself, so I couldn’t really be lifting the hitch, threading the bolts, AND taking photos. So if you have a friend helping, or a patient wife, perhaps they can get some photos during the lift procedure.
Good luck and enjoy the new hitch! I have to say, every time I see an outback with random brand hitch on there, with the bar sticking way below the bumper, I’m reminded how glad I am I chose this one!
Nigel
Thanks Nigel – one more quicky, as lame a question as this is. Having seen and handled the hitch when it was delivered, think it would fit in the trunk of the Subey without laying the rear seats down? I’m going to the NY State with the family and will pick it up on the way back, but not sure if I need to figure out a method to strap it to the roof rack, or if the stars align and I can fit it in the trunk.
Mike
Mike,
That’s a good question… I’m not sure if it would lie flat back there, but I don’t think you’d have a problem fitting it back there in some orientation.
It’s pretty heavy and unwieldy so I’d avoid aiming for the roof rack.
I guess I’m reviving an old post. Appreciate the thorough review. Like you, I’m having difficulty w/ the driver’s side rearmost exhaust hanger. Any other tips/tricks you found helpful that weren’t mentioned? I’ve sent some pics of my issues to Torklift so hopefully I’ll hear back soon. It seems a slight adjustment to the design would resolve the issue for future buyers.
I’ve seen some folks reference using a bit of WD-40 to help the hanger go on, but basically I summoned He-Man and beat on it until it cooperated.
Thanks for the great post. Just some FYI notes for those still doing this, I just installed torklift on 2013 outback wagon.
I had the same problem where the hitch crunched up in to the sheet metal a 1/4″ or so where the hitch side rails are notched to avoid doing that.
I used some 1×2 wood shoved down the frame member to keep the bolts which worked great to keep them from coming out. Then following your example above I duct taped a wrench to one of the 1x2s to keep the nuts from turning.
I was able to just cut a hole in the bumper fascia leaving the attachment point for the center plastic rivet. So the strip of fascia with the hole in it is 1 1/2″ wide or so. I made the hole about 6″ wide and probably 4″ deep or so. There was a marking on the inside of the bumper that looked like it might be tracing for factory cutout or similar. I had to go a bit wider but used it as a guideline. Cut with box cutter with several passes.